|
|
OwlWatcher is designed to help people observing behavior to record their observations using an ontology. If you are reading this, you most likely have an interest or reason for observing and recording behavior, but the ontology part is probably less clear. This section will try to explain why an ontology is a useful framework for recording behavior and what sorts of projects are most likely to benefit from using an ontology. Although OwlWatcher provides a number of tools that will be useful to anyone scoring behavior, there are a number of other free and commercial applications that may be more appropriate to behavior studies that wouldn’t benefit from using an ontology.
An ontology starts with a collection of terms. For the moment think of a term as a word or phrase, that for our purposes refers to a type of behavior or a concept you would use in describing behavior. For example, raise head, walk, or sidle display could appear in a behavior ontology. So could terms like head, repetition frequency, or even reproductive function.
Ontologies, in the sense used by computer scientists and bioinformatics researchers, are a way to share information: between humans and computers as well as between different software applications. OwlWatcher is designed to work with several ontologies simultaneously. Most frequently, you will start with an ontology of behavior terms and augment with additional ontologies that would supply terms for anatomy, for time, or for representing biomechanics. OwlWatcher maintains its own ontology of concepts that it understands what to do with. These concepts include other ontologies, both user created and imported, data sources and viewers (e.g., video files and players), and some temporal concepts. This list of internal concepts will grow as OwlWatcher becomes more capable.
OwlWatcher will also have a mechanism to allow you to map concepts from external ontologies to terms in OwlWatcher’s native vocabulary - this will allow OwlWatcher to work with and reason with the other terms when it encounters them in ontologies you construct.
If you have any difficulties with OwlWatcher, please do not hesitate to contact me: Peter.Midford@gmail.com
Getting started with OwlWatcher requires three things:
If you are planning to work with video, you will also need an appropriate video player library. This could be QuicktimeTM for MacIntosh or Windows, or, in the future, another supported library1.
Installing OwlWatcher on Windows requires Java 6 or better. The only supported video at this time is QuicktimeTM which you will need to download separately. There is now a simple windows release OwlWatcher.zip. To install, just unzip the zip file and run the Owlwatcher.bat file in the top level folder. Note: if you run the version in the embedded bin folder, plugins will not load and the application will probably crash.
Installing OwlWatcher on Mac OSX requires OSX 10.4 or better and Java 1.5. It should also run with Java 6. It has been tested with Quicktime 7, though it might work with Quicktime 6. To install, download the OwlWatcher.dmg file, open it, and drag the OwlWatcher application to a suitable folder (e.g., the Applications folder in the system area or under your home folder). Simply double click the application to get started.
Installing OwlWatcher on a *nix type system requires a Java JRE running 1.5 or better. Currently there are no supported video players, though this will change. To install, download the OwlWatcher.tgz file, and from a console window, unpack it with tar -xzf OwlWatcher.tgz. In the resulting directory, you can start OwlWatcher by executing the OwlWatcher.sh script.
The first time you start OwlWatcher, the application will configure itself and will display the preferences window. Currently the only options on the preferences window are the location where OwlWatcher will keep local copies of ontologies you read across the net, and a display option for classes. In most cases you can just leave the defaults as they are, and choose the OK button on the window.
For a quick introduction to what OwlWatcher can do, download the Demo Package from the link on the OwlWatcher homepage (http://ethotools.sourceforge.net/owlwatcher). When you open the archive, you will find three files:
Download and install the latest OwlWatcher release and download and unpack the Demo Package archive into a convenient location. Then start up OwlWatcher. What appears is called the Project Tab View. It consists of two areas: a column on the left that will display the structure of the project, and a larger area that can display details of components of the project. There is also a set of tabs near the top of the window. On start up, the project tab is selected and is the only tab that can be selected. You can move the pointers over each of the tabs to see a message describing their availability.
In the file menu choose “New:Project...” and when the save dialog appears, navigate to an appropriate fold and enter the name of a project file, which should use the extension .rdf (e.g., test1.rdf). Notice that the left side panel now contains a project structure. The root of the structure is labeled with the name of the project and there are three subparts to the project: “Ontologies”, “Resources”, and “Individuals.” If you open the Ontologies folder, you will see the Target Ontology, identified by its icon, which is nearly always named the same as the project, but with a different file extension (.owl). The Resources and Individuals parts are at this point.
Next choose “Open:Ontology from File..” from the file menu and, in the file dialog that appears, locate the abocore.owl ontology file and click the open button. The added ontology appears below the target ontology in the project tree. The icon represents a generic ontology. It is possible to add more than one ontology to the project (though never more than one target ontology), but this example will just use the ontology you just added.
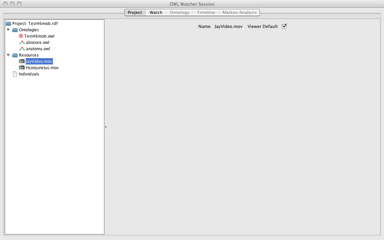
Now you need to add a source of data to the project. Go back to the file menu and select “Video From File...” and in the file dialog that appears, locate the jays.mov file and open it. Notice that the Resources item has become a folder, which contains the video file. At this point, the Watch tab will become active. Before switching, try selecting each of the ontology files and the video file and see the effect on the main portion of the tab view. Later versions will include additional information. Don’t worry about setting the ”Viewer Default” checkbox for the movie file.
Now select the Watch tabe. After a moment, the window should change and show a different set of areas. On the right you will see the first frame of the video clip. Below the clip are some motion control buttons. Above the clip is a time indicator. On the left side, you will see an empty white pane with the word “Root” at the top left.
Click once on the word “Root” to select the pane then double-click to open the tree (you will see the word “Thing” appear below “Root”).
Click on the triangle next to “Thing” to open up the tree further. The tree contains all the terms in the ABOCore ontology. For more information about the ABOCore ontology itself, refer to the website www.ethodata.org. For the purposes of this demo, locate the concept “Move head” in the ontology (its ‘path’ is Root:Model:root of:Behavioral Acts:Body part movement:Move head).
The video player currently has only four controls: back one frame, stop, forward one frame, and run. Start the movie and let it run until the first jay is in the ring and starts digging (around 5.44 seconds into the clip).
Suppose you wanted to record the bill sweep that occurs in the following two frames. First you should create a subclass of the appropriate existing term. I would suggest “Move head” as the most appropriate superclass, since the bill is not opening or moving relative to the head. So, open the Move head concept and see the three concepts below it. “Shake Head” is the most appropriate of the three subclasses. To create a new subclass of “Shake Head”, start by selecting the add subclass button. This is the left most of the three buttons above the pane with the tree, the one with the green plus symbol in the box. You can also use the “Add subclass...” command in the ontology menu. Once you have selected the commend, click once on the “Shake Head” concept. A little dialog will appear and ask you to name the new subclass. Call it Bill Sweep (no quotes) and click the OK button. Now a triangle appears next to “Shake Head”, which, when selected will show the new subclass. Now go back to the video and step the clip forward and backward until you find a frame with a bill sweep. Now just click the “Bill sweep” concept to record an instance of this type of event. You can step forward and find further examples of this class to record.
Now that you have recorded some behavior events, save your project and data, using File:Save. Now if you look in the location where you saved the project file, you will find two new files, one with the extension .rdf and the other with the extension .owl. The first of these contains project settings, and the second one contains your new class and records of whatever events you recorded. If you open up the OWL file in an editor, you may be able to find the definition of Bill sweep as a subclass of Shake head and a number of time stamped instances of Bill sweep. If you are familiar with OWL editors such as the Protege OWL plugin or SWOOP, you can look at the file there as well. In Protege, use the triples view to see the time stamps for the individuals.
You can also export a list of events scored in the project to a “comma-separated value” (.csv) file. Files in this format can be loaded into Microsoft ExcelTM or most statistical programs. To do this, chose “CSV Export” from the Export submenu of the File menu. After showing you a file dialog so you can specify the location of the CSV file, the program will show you a small option box with two options. The ‘Sort by time’ option should be self explanatory, especially since the event time will be listed in the first column of the data file. The second column will contain the type of event that was recorded as having happened at that time. If the ‘List full hierarchy’ option is selected, then the classes above the event’s class will be recorded in columns extending to the right in the CSV file, as many as are needed. For example, the columns for a Shake Head event event would contain (left to right) the time, Shake Head, Move Head, Body part movement, Behavioral Acts, root of, Model, and Root. If the ‘List full hierarchy’ option is not selected, only two columns will be listed. Choose the OK button to save the CSV file and look at it, either in a spreadsheet or text editor to see how it works.
To reload a previously saved project, choose “Open:Project From File...” on the File menu. The command currently reloads the project and ontology file(s), leaving you ready to select the Watch tab and load the video. The project file will save more editor state (e.g., the video file and what tab you were last using) in a later release.
After the configuration process is over, the main OwlWatcher window will look like one of the following screens, depending on your computer’s operating system. Now chose new project from the file menu. In the file chooser dialog that appears, enter a file name and include the extension ”.rdf”. For example, demo.rdf.
Now you need to tell Owlwatcher what ontologies you will be using to define the behavior terms you create as you observe. For this example, you can just use the ABOCore ontology, for which an OWL translation has been developed as part of the Ethotools project. There are two ways to tell OwlWatcher where to find an ontology: either on the web using a URL, or in a local file. You can get a local copy of the OWL translation of ABOCore in the demonstration package, available from the OwlWatcher home page, or you can just specify the URL of a copy on the OwlWatcher website: http://ethotools.sourceforge.net/owlwatcher/ontology/abocore.owl.
If you are wondering about whether to use a local copy or web-based copy, the most important consideration is whether you will have an active internet connection available while observing. If you, you need to have a local copy. It might also be preferable if your connection is unreliable or slow. On the other hand, using a web-based copy allows for possible updates - which may or may not be a good thing.
In OwlWatcher 0.35 and above, when a web-based ontology is first loaded, the program will save a copy in a special ’cache’ location. It will use this saved copy in subsequent sessions if it encounters problems with connecting the the internet. The current version of OwlWatcher doesn’t check for updates to web-based ontologies. If you wish to update, the easiest thing is to use the preferences menu to find the cache location and then walk down the directory (folder) structure to find the cached copy and delete it. The program will then load the newer version and save a copy when it next loads an ontology that uses it.
Once OwlWatcher has a project and an ontology, it will list the names in the Project Pane. If, as in this example, the session will use only one base ontology, you can proceed to the Watch Tab by selecting it. The watch tab contains a number of panes. To see them fully, you will first need to load a video clip. For this example, you can either use a QuickTime video of your own, use the 20 second clip of Florida scrub jay behavior (Midford et al. 2000). This clip is available in the demonstration package, available from the OwlWatcher home page.
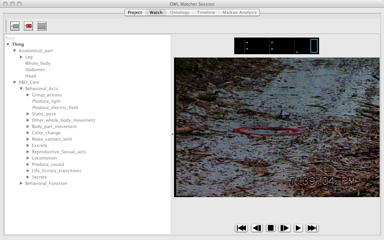
Once the view clip is loaded, the Watch Tab will fill in its two panes. In the left pane, trees for each ontology you loaded into the project will appear. Currently, only the root of each ontology will appear. Next to the root will be an icon (varies based on what operating system and computer you’re using). Click the icon to expand the tree below the root. You can continue expanding using the icons next to subnodes in turn. Above the panel showing the trees, there is a button menu.
The right pane will have three panels. The middle panel will show first frame of the video you loaded. The top panel will show the elapsed time, which should be 0. The bottom panel will contain buttons to control video playback.
Scoring with OwlWatcher consists of playing the video and recording events by clicking on their types in the tree. For example, if you saw a scrub jay taking a step, you could score a Move limb appendage event by clicking on the term in the tree. Not fast enough to keep up with the video? You can stop the video at any point and step through frame by frame using the buttons on either side of the square stop button below the video. Step to where you want to record the event and then click on the term.
What if you want to define a new type of action, one that refines a term in the tree? That’s what the left-most button, the one with a green ”plus sign” is for. For the system to understand you, you must choose the button first. When you press the button, it changes color to show that it’s active. If you change your mind, just press it again. Otherwise, just chose the term you want to extend and click on it. When you do so, a small window will appear to allow you to enter an id for the new term. Press the window’s Ok button and the term will be added to the tree.
You can use the second button, the one with the red X to delete terms you’ve added in the same way. Again, select the command first, then the term.
The third button will, in the future, allow switching between the tree view and a view that only shows buttons for each term at the tip of one of the trees. This should support faster scoring, which could be especially useful for scoring real time events.
When you are done scoring the video, use the save command from the file menu. This will save two files: the first, with an rdf extension, contains project information; the second, with a owl extension, contains your data, including all events and any classes you defined. It won’t contain all the terms you saw on the tree, those are defined in the ontology files you loaded at the start. If you are familiar with an ontology editor, such as Protege or Swoop, you can use it to look at your data file. If you are using Protege, you need to have the owl plugin installed.
You can also export a list of events scored in the project to a “comma-separated value” (.csv) file. Files in this format can be loaded into Microsoft ExcelTM or most statistical programs. To do this, chose “CSV Export” from the Export submenu of the File menu. After showing you a file dialog so you can specify the location of the CSV file, the program will show you a small option box with two options. The ‘Sort by time’ option should be self explanatory, especially since the event time will be listed in the first column of the data file. The second column will contain the type of event that was recorded as having happened at that time. If the ‘List full hierarchy’ option is selected, then the classes above the event’s class will be recorded in columns extending to the right in the CSV file, as many as are needed. For example, the columns for a Shake Head event event would contain (left to right) the time, Shake Head, Move Head, Body part movement, Behavioral Acts, root of, Model, and Root. If the ‘List full hierarchy’ option is not selected, only two columns will be listed.
The Project Tab is the tab view that OwlWatcher displays when it is started. It is also the only view that is available until a project is loaded. It provides two panes, a tree view of the components of your project in the left pane and a pane for displaying detailed information on a particular component on the right. The view also provides a set of commands for loading and configuring your project. Once your project is loaded and configured, OwlWatcher will allow you to proceed to the Watch view.
A project consists of a project file which describes the files in the project and a ’target’ ontology file, which contains the classes and individuals that you create in the course of your observation. The project file is serialized (written) in RDF/XML (cite w3c), while the ontology is serialized in OWL also using the RDF/XML syntax. Additional formats for the serialized ontology, such as OBO or Manchester syntax should be easy to add in the future.
There are two other types of files included in a project: ontologies and resources. Although the only ontology you can change with OwlWatcher is the target ontology, other ontologies are necessary to provide terms (and relations) for a base to build your ontology on. There are two types of additional ontologies: loaded ontologies, and imported ontologies. Loaded ontologies are those you specifically add to the project to provide terms. For example an ontology of basic behavior or anatomy terms. You add a loaded ontology to the project by opening an ontology, specifying either a local file or a URL to load from. Loaded ontologies also appear in the project tree in the left hand panel. Imported ontologies are ontologies that are mentioned in import assertions of other ontologies and, like loaded ontologies, supply terms. In the context of OwlWatcher, imported ontologies are those that supply terms to loaded ontologies. Imported ontologies are, by default not visible in the project tree. Note that once a loaded ontology is mentioned in the target ontology, it is technically imported by the target ontology - however, the act of adding it to the project makes it loaded rather than imported.
Note that the current version of OwlWatcher does not distinguish between events and states. It seems that the proper ontological implementation of that will require the use of restrictions. Eventually there will be a ’built-in’ ontology that will provide terms for event and state. You will then specify whether a particular action term is an action or a state by forming a restricted subclass an action term. The restriction will specify that the subclass is temporally either an event or a state. If you choose to use a different ontology for time, you will be able to form a mapping between the imported temporal ontology and the built-in one, so the OwlWatcher will know whether the restriction defines a state or an event.
This section provides a detailed discussion of the commands and operations available on the Watch page. The most important thing to understand about the operation of the watch page is that its purpose is to record events. This is not the place to edit the event hierarchy, with the exception of adding or deleting a new class. Filling in details of the ontology occurs in the ontology page, or optionally in an external editor.
The class display area displays the available set of terms. By default, the display consists of one or more hierarchical trees. Each tree corresponds to an imported ontology - terms in the current ontology will appear as leaves from one or more of the trees of imported terms. Imported terms appear in grey, whereas the terms you add to the current ontology will be in black. There are four basic operations you can perform with the class display:
The ontologies tab will allow you to relate your behavior instances to other ontologies.
Currently OwlWatcher supports one plugin, the CSV exporter.
The CSV Export plugin allows you to export behavior instances you have recorded to a “comma-separated value” (.csv) file. Files in this format can be loaded into Microsoft ExcelTM or most statistical programs. The file will contain one row for each instance, but the number of columns may vary. The first column is always the time, which is current displayed whatever units the video clip and player use internally. For QuicktimeTM this is 3000 units per second or 100 units per frame. The second column is the behavior class you scored this event as. Third and later columns may contain the class hierarchy above the selected class if selected as an option. The file currently does not include headers. When the exporter is selected, a dialog appears allowing you to specify where to save the file. After specifying the file’s location, the plugin puts up a small dialog with two checkbox options. The To do this, chose “CSV Export” from the Export submenu of the File menu. After showing you a file dialog so you can specify the location of the CSV file, the program will show you a small option box with two options. Sort by time sorts recorded actions by time. List full hierarchy includes the class hierarchy of the scored behavior class in the third and subsequent columns of the .csv file. For example, the columns for a Shake Head event event would contain (left to right) the time, Shake Head, Move Head, Body part movement, Behavioral Acts, root of, Model, and Root. If the ‘List full hierarchy’ option is not selected, only two columns will be listed. .